Monday, October 1, 2012

Roasted Butternut Squash Soup


Is there anything better than the fall weather? I love this time of year! I love the cool air at night, the slowly changing leaves, the smell of the outdoors, the allure of apple picking and the beginning of soup season! As anyone who has ever worked with or even met me knows, I could live off of soup!

One of my "52 Weeks of New Food" recipes for 2012 was Roasted Butternut Squash Soup. I hit the farmer's market, picked up everything I needed and got to cooking!

But...I decided to take a shortcut. Cutting butternut squash is a pain! So I decided to make it easier on myself by pricking it with a knife and putting it in the microwave for ~10 minutes to soften it. When I went to open the microwave door, the squash lept out of the microwave! By some small miracle, it landed in the crock pot in my counter, avoiding spraying orange goo all over my kitchen.

Anyway, I salvaged the squash, and cut it down into about 5 cups of chunks. I tossed the squash with 1 Tbsp of olive oil and roasted at 400 for 30 minutes until it was soft and roasted.


The result was delicious! Roasting the squash gives it a deeper flavor, but you can skip that step if you really want. Try my recipe below, but be careful of flying squash!


Ingredients
  • 1 Tbsp olive oil or butter
  • 1 medium onion, diced
  • 1-2 cloves garlic
  • 4-5 cups of roasted butternut squash
  • 4 cups of chicken broth (you can use more if you like more thin soup, this is fairly thick)
  • 1/2 cup heavy cream (I used half and half) 
  • 1 tsp fresh sage, chopped (plus more for garnish)
  • Salt to taste
Directions 

Heat the olive oil or butter in a large soup pot on medium high heat. Add the onions and cook until soft, about 5 minutes. Add the garlic and stir until fragrant, only about 2 minutes.Add the sage and give a quick stir.

Dump in the squash and then add the broth. Simmer for about an hour, until the squash is soft. Once the squash is soft, use an immersion blender (or a real blender if you don't have one) to puree the soup until it's thick and combined.

Add the heavy cream or half and half and adjust the seasonings to taste. If you want a thinner soup, add some additional broth at this step.

Serve piping hot in pretty bowls and garnish with additional sage. A perfect fall treat!

Friday, September 28, 2012

Polenta with Sundried Tomato, Artichoke and Olive Ragout

I made this recipe mostly because I wanted to make polenta. I had no idea what it really is, except that it was cornmeal.

I made it with Parmesan cheese and fresh basil, but I wasn't sure I was in love with it. That did not stop me from trying half of the pot! I made this thinking I could reheat it to eat later, but you can't reheat polenta! Who knew?!


I'll direct you to this website for the recipe: http://www.wearenotmartha.com/2010/04/creamy-polenta-with-artichoke-caramelized-onion-and-olive-ragout/

    Tuesday, August 28, 2012

    What is Green Juice?

    Because I read so many health blogs and magazines (even if I don't always follow their advice!), I've been hearing about the benefits of juicing for years. Lately, I've been seeing lots of recipes for "green juice." I had a ton of spinach left over from this weekend's trip to the farmer's market and felt like having something healthy for dinner that wasn't spinach salad. I did some Googling on green juice recipes and ideas and decided to try it.

    I threw about 4 handfuls into my Magic Bullet blender with a few strawberries (about 8 of them), a teaspoon of Truvia and about a half cup of blueberries. I blended until it was liquified and then added ice and blended again.

    It came out a disgusting color, but it was delicious, filling and healthy! What a great way to get your greens! Try it and send me fun recipes!

    Sunday, August 26, 2012

    Buffalo Blue Cheese Turkey Meatballs

    The weather is getting cooler, fall boots are on display--that means football season is right around the corner! I'm not a huge sports fan, but I am a huge fan of tailgate fare!! Here's a really quick and easy way to do meatballs-buffalo style!

    I liked that there was no need to pan fry the meatballs (which is a complete pain and the sole reason I don't make meatballs more often), and the taste of the fresh parsley added a different note of flavor to the meat.

    Ingredients:

    1 pound ground turkey (you can probably use any meat) 
    1 small onion, grated
    4 cloves garlic, chopped
    1/2 cup fresh parsley, chopped
    Salt and freshly ground black pepper
    1/2 bunch scallions, thinly sliced, divided in half
    1 c. crumbled blue cheese, divided  
    Extra-virgin olive oil, for drizzling 
    2 tablespoons butter
    1/2 cup hot sauce (such as Frank’s)

    Directions: 

    Preheat oven to 400ºF.

    Combine the first six ingredients in a bowl and gently mix. Once the mixture has come together, add about 3/4 cup of the blue cheese and gently incorporate.  (Overworking the mix leads to really tough meatballs!)

    Roll the meat mixture into balls. (I had about 30 small ones.)

    Arrange the meatballs in a nonstick skillet (I used a 16") and drizzle them with just a little bit of olive oil. Place in the oven and bake until the meatballs are cooked through and golden brown, about 12-15 minutes. 
    While the meatballs are baking, melt the butter in a large skillet over medium heat. Add the hot sauce and whisk to combine. Toss the baked meatballs in the hot sauce to coat.Add additional blue cheese and scallions to garnish. Serve with celery and blue cheese dressing.

    Recipe adapted from: http://www.rachaelrayshow.com/food/recipes/buffalo-chicken-meatballs/

    Saturday, July 21, 2012

    Don't Faint, BUT...

    I don't want any of my dear readers to faint when they read this, so I'll just tell you right away. Boyfriend made me dinner the other night.


    Hello? Are you there? Did you faint? No? Good. Read on!

    A few months ago, his employer paid for a culinary "team building" event, and since then, he's wanted to recreate the dish for me. On a lazy Saturday, we did a complete role reversal: I laid around on the couch watching cooking shows, and he slaved away in the kitchen! It was glorious! He made a delicious chicken saltimbocca with roasted garlic potatoes. I just had to post this as proof!

    Monday, May 7, 2012

    Shrimp Scampi Recipe > Worst Blogger Ever

    We can talk about how I am the worst blog updater ever (whoopsies!), or we can talk about the fabulous shrimp scampi I made this weekend. (Woo hoo- crossed another item off of my 52 weeks of new foods list!)

    I had a small fear of cooking shrimp. Okay, I'm still a little scared of those suckers. Usually I bake it so it's perfectly cooked and delicious, but when I first started really cooking a few years ago, I got cocky and served basically completely raw shrimp in a salad. Awesome.

    For this recipe, I lightly sauteed the shrimp in good olive oil and took them off the heat when they pinked up. This food actually tells you when it's done! (Be careful of reheating this recipe though- shrimp gets gummy and disgusting.) Not that you will have leftovers...

    I wanted a simple, healthy fresh and classic dish for a cozy dinner party and went straight to my "Cooking 101" aka America's Test Kitchen 547985835483 page cookbook. I found this recipe, made a few tweaks and it came out pretty great! I believe Boyfriend gave this a 9/10. I was sort of pushing for a 10, but diva informed me he "doesn't give those out so easily."
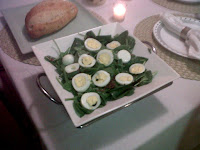
    I served this with Parmesan shavings, Celebrity Chef Obsession Ree Drummond (aka The Pioneer Woman's) Spinach Salad (amazing!! Ree's food is always so much prettier than mine!) and crusty garlic bread with whole roasted garlic cloves to soak up the lemony sauce.


    Hope you enjoy!


    Ingredients

    • 1 1/2 pound shrimp, shelled and deveined (I used fairly large shrimp at 21-25 per pound)
    • Kosher salt and freshly ground black pepper
    • 2 Tbsp olive oil 
    • 4 tablespoons unsalted butter, divided
    • 4 cloves minced garlic
    • 3 Tbsp. dry white vermouth
    • Juice of 3 lemons (mine were small when I tried this recipe, though! Put them in the microwave for 15 seconds before you squeeze- they juice better!)
    • Finely chopped flat-leaf parsley leaves (for garnish) 
    • Grated lemon zest (careful! This is strong!)
    • Cayenne pepper to taste

    Directions

    Rinse and pat the shrimp dry. Arrange them in one layer on a serving platter or cookie tray and season both sides with salt and pepper. 

    Heat  1 Tbsp of the olive oil over medium high heat. When the olive oil is shimmery, add half of the shrimp and sautee with a soft spatula and tongs until the shrimp pink up. Remove to a large bowl and repeat with the second half of the shrimp.

    When the shrimp are done, squeeze a bit of lemon juice over the shrimp and cover with aluminum foil to keep warm. (Don't make the shrimp in advance. This recipe works best fresh!)

    **NOTE: If you plan to serve the shrimp over pasta, double the ingredients in this next section. Pasta soaks up the sauce quickly! Nobody likes a dry scampi!**
    In a large pan over medium heat, melt 3 Tbsp of butter (yes; not a health dish, friends). Add the garlic to the melted butter (you can do this off the heat if you tend to burn your garlic) and cook until fragrant. OFF THE HEAT, but to the hot pan, add the vermouth and remaining lemon juice and scape the flavor-packed brown bits from the bottom of the pan. Let the mix come to a boil and season with salt, pepper and cayenne to taste. 

    Add the shrimp back into the pan to ensure shrimp are heated through. Add fresh parsley and lemon zest.

    Serve over angel hair pasta (to which I add the last Tbsp of butter!) to make it extra delicious.

    Sunday, April 1, 2012

    Herb Roasted Chicken and Creamy Pea Risotto

    I FINALLY got around to making two dishes I've had on my "to do" list forever- roast chicken and risotto! The sense of accomplishment I got from making two fairly complicated dishes was amazing! Boyfriend was working late and my family was scattered across the eastern seaboard so mom and Brother #2 came over for a nice and simple (and may I add DELICIOUS) Sunday dinner.

    The chicken is actually much easier than I thought (I may debate not buying those rotisserie chickens - may) and the risotto is my new go to comfort food- it's like macaroni and cheese for foodies.


    I remember watching my mother and grandmother pull the "giblets" out of the turkey on Thanksgiving and gagged every time. My first experience with a raw chicken was still gagworthy but I got through it. :) I stuffed the cavity of the chicken with lemons, onion, garlic and rosemary and poured herb-infused melted butter and olive oil  over the chicken. (I used this recipe as a guide: http://www.tasteofhome.com/Recipes/Roasted-Chicken-with-Rosemary)

    The risotto was amazing and while it took a lot of time (and attention to detail- my least favorite thing in life), it really was amazing. I used a Pioneer Woman recipe as a guide (Ree is everything I hope to be in life- I adore this woman!) and added peas at the very end for color and health factor.

    I served the chicken and risotto with candied carrot coins and rosemary garlic bread.

    Creamy Pea Risotto

    Ingredients:
    • 2 cups Parmesan and Pecorino Romano cheese 
    • 3 cloves garlic
    • 1 Onion (or 1-2 shallots)
    • 1 Tablespoon Olive Oil
    • 1 Tablespoon Butter
    • 1 pound Arborio Rice
    • 6 cups chicken broth
    • 1 cup half and half
    • 2 cups frozen peas (run under hot water and unfrozen)
    • Salt, pepper, and chives to taste
    Directions(from PW)

    Grate 2 cups of cheese. Peel and finely dice 3 to 4 cloves of garlic. Dice ½ of a large onion.
    Heat a large skillet over medium-low heat and add 1 tablespoon of Olive Oil. Then add 1 tablespoon of butter. Throw in the garlic and onion and sauté for a couple of minutes until the onion is translucent.
    Add 1 pound of Arborio rice and stir to coat the rice thoroughly. Adding 1 cup at a time, add 7-8 ounces of chicken broth, stirring constantly after each addition. As soon as it appears that the rice has absorbed each helping of broth, add in the next helping. Do not stop stirring. This process will take at least 20 minutes. Rice is done when it no longer has a hard bite.
    When more of the broth is absorbed pour in 1 to 1 ½ cups of heavy cream. Next add the grated cheese and stir thoroughly. Add peas. Add in plenty of fresh cracked pepper and about 1 to 2 tablespoons of chopped chives. Add salt to taste.